Micki’s photos
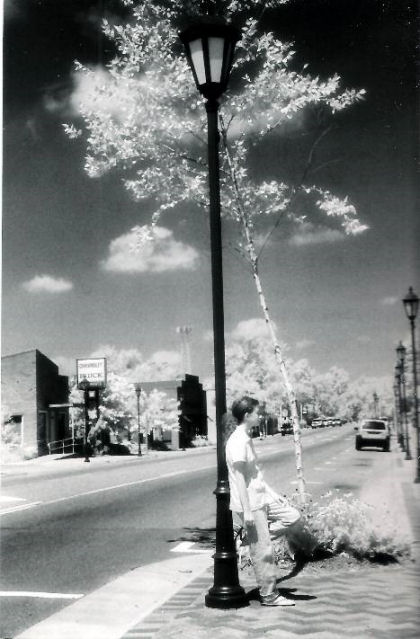
My daughter on infrared film
Infrared film is film that is sensative to infrared lighting and can help to create some very interesting photos from even the most ordinary of compositions. Infrared film comes in black and white and color. The color film is only available for slide, so I went with black and white so that I could have the prints. The color film will show green foilage as red and blue skies as magenta. For landscape shots, it is best to shoot in late spring to early summer when all the greenery outside is at highest chlorophyll production and the sun is so very bright. The best time of day to shoot infrared film outdoors is during those “forbidden photography hours” of late morning to mid-afternoon.
Before purchasing a roll of infrared film to shoot (about $12-$14 per roll for the Kodak Black and White), check your camera’s manual to see if your camera is safe for shooting infrared. The plates that imprint the date onto film will cause the film to fog, as well as the frame counter. My new Minolta is unsafe for shooting infrared film.
Next you must decide how much of a halo effect you want in your pictures. I wanted quite a bit, so I went with the Kodak brand over the Ilford, because it has more of a halo effect, as well as a couple of extra qualities. Infrared film must be kept in complete darkness until it has been exposed, so you must load the film into your camera in either a completely dark room or use a film changing bag. (I did both, just to be sure.) You must also have a dark red filter (they do make special infrared filters, but a plain old #25 works just as well and is great for when you shoot regular black and white shots that will show a lot of sky.) When taking the pictures, it is highly recommended that you bracket on both sides. I mostly bracketed only in one direction, but toward the end of the roll did both ways. It just depended on what I was shooting and the effect I wanted in the shot.
To take the exposure, have the filter on and allow the camera to set shutter speed and aperture and to focus the subject. Then switch the lens over to manual focus and note where the lens shows the setting to be for correct focus. At this point, turn the lens until the red “R”, the red line, or dot, or the white line on your lens is in line with where the camera had focused the subject. That’s correct, you shoot your infrared film out of focus. This scared me into thinking I was going to waste a $12 roll of film, a $23 developing cost, and two hours of my Sunday afternoon. But almost all of my compositions came out in focus except for four compositions, and I THINK I might know what went wrong there. I have since ordered a step down ring so that I can shoot with more than one of my lenses. I used my 35-135mm zoom lens for this roll of film. I also set the camera to ISO 200 as was recommended in one of the books I read regarding infrared film. Don’t forget to unload the film in complete darkness as well, and have it developed as soon as possible. (Although I waited almost two weeks before I got my film to the pro shop.)
All photos and stories by Micki from Virginia.


